10/27/12

Kitchen plans...finally some progress

So guess who finally bought their IKEA kitchen? Huh? Whose that? No, no. It is US! WE DID! After the 3rd time of driving up to IKEA to buy our cabinets we finally bit the bullet. Here is a reminder of what our kitchen looks like now.

And here are our final plans for our new kitchen.

Top View
We're going to switch our dining room and family room so the dining room will now be part of the kitchen. Our old dining room will become a cozy sunroom.

Front View
We'll put an island in front of the low window that will serve as extra counterspace and a casual eating area. It also helps expand our kitchen more than what it really should be.

Sink Wall View
Now our dishwasher will be in the kitchen and right by the sink! We'll hang open shelves in that blank area for our everyday dishes.

Pantry Wall View
Our pantry will quadruple in size! It will have pull out shelves so we can get to things in the back.

Here is a sample of what we bought.

1. Ramsjo Cabinets in White
2. Faglavik Handle in Chrome
3. Stenstorp Kitchen Island
4. Elverdam Faucet
5. Domsjo Sink
6. Ramsjo High Cabinet

Here are some possibilities for backsplashes and countertops that we haven't purchased yet:

Backsplash

Option #1. White ceramic octogon tiles- I love the vintage look they have!

Option #2. White ceramic subway tiles in a herringbone pattern. I get a little too excited over herringbone! LOVE it!

Countertop
Option #1. This is the countertop I want: IKEA's Numerar counter in oak (inexpensive and so warm looking!)

Option #2. Here is the countertop Brandon wants: black quartz (I think it might be called galaxy black at IKEA-this picture shows a sample over the white Ramsjo door)
For our floors we'll use 2 1/4" gunstock red oak prefinished hardwood to blend with the rest of our house. We chose prefinished both for convenience and durability. 
Appliances we have yet to purchase, but we're going to go with stainless steel, and the fridge will be counter-depth. We're hoping to snag a good deal for Black Friday.
As for lighting, we haven't decided on that at all.

Anyway, that's the latest with our kitchen plans! We're hoping to start installation in December because our cabinets are being delivered November 28th. Until then we need to demo our current kitchen and install the floor. Exciting, right?

10/23/12

Master Bedroom Closet

Remember this list 2 posts ago?
 
"Today: Prep and paint the trim in the master bedroom, edge wall color
Tuesday: Paint the master bedroom; Finish priming the bed frame; work the nightshift
Wednesday: Sleep, then work again
Thursday: Sleep, then install the new fixings for our closet
Friday: Finish up whatever I didn't get done during the week
Saturday: Finish painting the bed frame, and our dining table; work the nightshift
Sunday: Sleep, then work again..."
 
Well now it looks more like this:
 
Today: Prep and paint the trim in the master bedroom, edge wall color
Tuesday: Paint the master bedroom; Finish priming the bed frame; work the nightshift
Wednesday: Sleep, then work again
Thursday: Sleep, then install the new fixings for our closet
Friday: Finish up whatever I didn't get done during the week
Saturday: Finish painting the bed frame, and our dining table; work the nightshift
Sunday: Sleep, then work again...
 
Yeah, almost done! (Saturday's list is actually being finished today...2+ weeks late...but whatever...we got everything else done on schedule!)
 
Here is the first post showing off that list's results...our master bedroom closet!
 
I had been wanting to rethink our closet for awhile because it just seemed inefficient and a waste of space. And it is rather small for a walk-in closet, so every inch needed to be used. And there's also the fact that I wanted to store more in the closet so we could get rid of Brandon's dresser. Hmm, tall order. Here is the inefficient-waste-of-closet-space before picture (nevermind the edges-we stitched pictures together for a wide-angle view)

So we took everything out...
...took out the closet bars and the top shelf (which revealed that the closet used to be painted lilac which forced us to paint the walls which made us think we might as well paint the trim too...)
...we raised the top closet bar, added another bar underneath to take advantage of every inch, and assembled a tall shelf for folded items...
...finally we added a peg board for accessories, covered all the remaining shelves with paper, and bought bins for seasonal clothes...voila!
 
Double closet bars, yellow and gray shelf paper, peg board for accessories
pull out pants rack, pull out wire basket for exercise clothes, plastic bins for seasonal gear
Don't you love organization? Have you completed any organization projects lately or have an organizational project in mind? 

10/9/12

Room by room: an endless list of projects (part 2)

Here is part 2 of what we've done and have left to do in the house. This part mostly contains the bedrooms and bathrooms.

Master Bedroom

What we've done:
  • Changed our bedding
  • Bought a rug
  • Bought all our furniture for the room 
What we have left to do:
  • Paint these nightstands (never mind how long ago we primed them...and they're STILL not painted) 
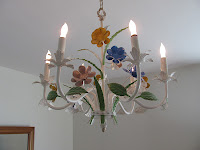
  • Refinish the chandelier (the bright colorful flowers just aren't what we're looking for) or change it out with a ceiling fan (boring but would be appreciated for hot summer nights)
  • Paint the bed frame or possibly create a new headboard (perhaps something rough and reclaimed?)
  • Organize our closet so we can get rid of my husband's dresser
  • Hang (and find!) artwork
  • Find two matching lamps for the nightstands
  • Paint the walls (probably we'll use SW Repose Grey to match our bathroom
  • Paint the trim (thankfully it's already white-ish, so it shouldn't take as long as the other trim in the house)
  • Add a few globally inspired throw pillows (I am really liking kilim touches right now) and perhaps a throw
  • Change out our curtains
  • Replace the light switches and outlets with matching white ones
  • Eventually refinish the floors
Master Bath

What we've done:
  • Painted the vanity and changed out the hardware
  • Swapped out the formica vanity top with a cool granite one
  • Painted the walls SW Repose Gray
  • Painted the trim
  • Added some nifty wall storage (I still have to write a post about it!)
  • Hung some cheap art from a bird print book
What we have left to do:
  • Decide whether we want to change out the shower doors with something less claustrophobic-maybe a curtain
  • Possibly attempt to retile the lower portion of the shower walls and floors (they're slightly mismatched due to a shower pan replacement deemed necessary from the home inspection)
  • Possibly demo everything and start again...who knows!
The Guest Room
 
What we've done:
  • Bought all the linens and curtains
  • Bought two twin beds
  • Hung artwork
What we have left to do:
  • Paint the walls and the trim (though surprisingly the odd blue trim kind of works for now)
  • Change out the outlets and light switches to white so they all match
  • Find a lamp for the nightstand
  • Spruce up the ceiling fan (maybe with paint)
  • Add maybe a couple of chairs and a small table on the wall opposite the beds
  • Perhaps refinish my husband's dresser that's being evicted from our room to be used here
  • and of couse, eventually refinish the floors
Guest Room Bath

What we've done:
  • Made over the vanity using paint, molding, and peel-and-stick tiles
  • Replaced the faucet
  • Replaced the light fixture
  • Stripped the wallpaper
  • Painted the walls
  • Painted the ceiling
  • Changed out the towel bar
What we have left to do:
  • Pull up the old vinyl flooring
  • Try to paint the subfloor (seen here)
  • Live with it for awhile
  • Then...demo everything except the tub!
  • Change the layout, moving the toilet over to share the wall with the vanity
  • Buy a smaller vanity and top
  • Tile the floor
  • Recenter the mirror (we bought an oval one a long time ago)
  • Recenter the light fixture
Hall Bath

What we've done:
  • We took out the dated sliding glass doors
  • Installed a curved shower rod
  • Stripped the wallpaper
  • Primed the walls
  • Replaced the ugly pinkish-tan toilet with a nice clean white one
  • Changed out the hardware on the vanity
What we have left to do:
  • Hmm, where to start? Replace the vanity with something a little smaller so it doesn't have the odd little cutout...and perhaps a porclein top (IKEA has some nice ones)
  • Change out the faucet
  • Demo the tiles off the walls
  • Put up some wainscotting or something in the place of the tiles
  • Paint the walls
  • Refinish (professionally) the tub and the tiles in the shower area to white
  • Replace the floor tiles
  • Change out the lighting-replace the ceiling fixture and add pendants in the vanity area
  • Hang a mirror
  • Add a little standing shelf unit for extra storage
Office/Temporary Guest Room

What we've done:
  • Bought bookcases to surround the window
  • Well...
What we have left to do:
  • Hard to say without a vision for this room!
  • May turn into a sewing room/office
  • Eventually (waaaaaaaay down the line) it'll hopefully be a kid's room
  • I guess for now we need to hang artwork on the walls, finally hang our diplomas (stacked in a forgotten corner for now), and hang our curtains on an actual rod (not a tension rod balancing precariously on the old brackets left by the original homeowners)
  • Paint the walls and touch up the trim
  • Oh, and organize the closet...that is never a waste of time no matter what the room is
Music Room

  What we've done:
  • Haha, barely anything (as you can tell!) other than hanging a few things on the wall and sort of hanging curtains (again balancing precariously on rods not actually installed)
What we need to do:
  • Get rid of extraneous furniture (ahem, such as that couch)
  • Set this room up as the music room it's supposed to be (find a way to arrange the amp, guitars, and all the numerous gadgets that goes with them)
  • Hang more art on the walls (add to the framed album covers already on the walls)
  • Eventually rip up the carpet and refinish the hardwood floors
  • Paint the walls (thinking of adding a plate rail and painting the wall below-maybe a sunny yellow?)

10/8/12

BUSY this week!

This week will be busy busy busy, so there won't be much in the way of blogging (but is there ever?). However, this week is busy with house projects, so stay tuned for upcoming blog posts when things slow down! Here is my to-do list this week:

Today: Prep and paint the trim in the master bedroom, edge wall color
Tuesday: Paint the master bedroom; Finish priming the bed frame; work the nightshift
Wednesday: Sleep, then work again
Thursday: Sleep, then install the new fixings for our closet
Friday: Finish up whatever I didn't get done during the week
Saturday: Finish painting the bed frame, and our dining table; work the nightshift
Sunday: Sleep, then work again...

Can't wait to update you!

10/3/12

A simple reupholstering project: dining chairs

Umm, so it's been forever since I actually reupholstered these chairs I bought off Craigslist. I just haven't gotten around to writing about it. You may have seen glimpses of them in our dining room pictures already, so they should come as no big surprise.
The fabric and foam was disgusting and disintegrated, so I had to rip everything off. I used a 1" densified batting as an alternative to foam because it happened to be on sale at Hancock Fabrics. It is also supposed to hold up better, not disintegrate, and resist mildew. I traced around the chair board onto the dense batting and cut.
Then I laid this over my batting (I used extra loft polyester batting, also from Hancock Fabrics) leaving a border of a few inches around.
I stapled on each side to secure the batting before tackling the corners.
As for the corners I first pulled each corner down, the folded the edges in like wrapping a present.

I then finished stapling the sides, making sure to pull everything nice and tight.
(Notice my little cheap stapler in the background-nothing fancy, just the cheapest one at Lowes.)
Next I flipped the cushion over and centered it on my fabric. I took my time to make sure nothing was crooked. I centered it, flipped it over, checked, then shot one staple into each side, then checked again before proceeding. It's a minor pain to unpick staples!

Then I wrapped the cushion just like with the batting.


Finally I Scotch-guarded the seats since they were going to be used in the dining room (I tested it first to make sure nothing funky happened to the fabric the night before).
And here is one finished.
And here they are in the dining room.
I used a coordinating print for the arm chairs. Better?

10/1/12

A little trick to hanging art

If you're like me, the thought of hanging picture frames is daunting, especially if they have to be symmetrical or precise. I can't stand when one frame is slightly off...shivers. Here is a simple way to make hanging art less daunting. Other people probably have better ways, but this is what we came up with. If you want to hang frames precisely and spaced exactly command strips are the easiest. But if you want your art to stay on the walls then here is a simple method to hang art using nails.

Here is the problem. He looks a little lonely and skimpy all by himself.
We wanted to add these frames that I refinished. So first we simply taped a strip of scrap paper next to the frame-nothing fancy nor measured. We had a scrap left over from a roll of brown paper. Next came the only part requiring a measuring tape. We marked on the paper where we wanted the edge of the frame to go-I think we used 2" between the gold frame and the new one. We marked it in two places so the new frame would be straight.

Next we needed to transfer the placement of the picture hanger on the back of the frame to the paper. We just used wood glue that happened to be lying on the coffee table from an earlier project. We just smeared a dab of the glue across the picture hanger, then held the frame up to the paper using the aforementioned measured marks to line it up and pressed. The glue left a mark so we knew exactly where to hammer our nail. Afterwards of course we quickly wiped off the glue from the hanger-we didn't have any problem with residue or anything.
Our strip of brown paper was long enough that we could use it to position both frames. Then we simply repeated this on the other side.
 
Voila! That wasn't so hard...so why do I still have frames leaning against my baseboards waiting for their turns to be hung?